
Attaching documents to your songs
TL;DR
You can attach one or more PDF, JPG or TXT files on the song edit pages (Repertoire > Songs), quickly switch between them, assign them to different users or draw annotations onto them.
If you have any documents for a song, such as a chord chart, lyric sheet or music notation, you can upload those documents into BandHelper and then attach them to the song. You can also attach documents to events (e.g., performance contracts), contacts (e.g., photos) and transactions (e.g., receipts) using the same process described below. You can watch a tutorial video, or read on for more details.
Note: You can attach documents in .pdf, .jpg and .txt formats. If you have documents in another format, you can export them as PDFs from the application in which you created them, or batch-convert them using a tool like this one.
Note: Attaching documents is similar to adding lyrics, but not the same. You can use this comparison chart to understand the differences.
The steps for adding documents are slightly different between the website and the apps:
Adding individual documents to BandHelper from the website
- Click the Edit button for a song, event, contact or transaction.
- Click the Add Documents button.
- The document edit page appears in a popup window. Click the file selection button, then browse to the file on your computer and select it. The file name will be copied into the Name field automatically, but you can enter a different name if needed.
- Change the document orientation to Landscape if needed; this helps the app display the document correctly.
- If you only want some users to see this document, select the desired users.
- Click Save in the edit window to add the document to your account and attach it to this song. The popup will close and the document name will appear on the edit page.
- If your document is too large to upload and download easily, or exceeds the file size limit, click the Copy To Devices Manually option in the edit window. Then you can install the document directly into BandHelper's data folder on your devices.
- You can repeat these steps to add more documents, then drag and drop to rearrange them. Then click Save on the edit page.
- If you want to attach a document that you have already added to your account, you can click Add Existing Documents in the edit window and then select from the list of existing documents.
- If you want to update a document that you have already added to your account, it's usually best not to delete the existing document and add it again. Instead, you can edit the document, click the file selection button, then select the updated file to replace it. This preserves the document's settings and annotations.
Adding individual documents to BandHelper from the iOS, Android or macOS app
- Navigate to the Songs, Events, Contacts or Transactions list and click an item to edit it.
- Click the Add Documents button.
- The document edit page appears in a popup window. Click the File button, then you can browse and select a file from any location your device can access, including local or cloud folders. Alternatively, you can click the Photos button to import a photo from your photo library or take a picture from your camera (iOS/macOS only). That's useful if you need a quick copy of a paper chart. If you want to use a file from another app, you might need to export it from that app to a folder, then select the exported file in this step. On iOS, you can export it to BandHelper's data folder, but in that case, BandHelper will ask if you want to replace the file when you select it and you can choose Replace.
- After selecting a file, the file name will be copied into the Name field automatically, but you can enter a different name if needed.
- Change the document orientation to Landscape if needed; this helps the app display the document correctly.
- If you only want some users to see this document, select the desired users.
- Click Save in the edit window to add the document to your account and attach it to this song. The popup will close and the document name will appear on the edit page.
- If your document is too large to upload and download easily, or exceeds the file size limit, click the Copy To Devices Manually option in the edit window. Then you can install the document directly into BandHelper's data folder on your other devices.
- You can repeat these steps to add more documents, then drag and drop to rearrange them.
- If you want to attach a document that you have already added to your account, you can click Add Existing Documents in the edit window and then select from the list of existing documents.
- If you want to update a document that you have already added to your account, it's usually best not to delete the existing document and add it again. Instead, you can edit the document, click the File button, then select the updated file to replace it. This preserves the document's settings and annotations.
Adding a batch of documents to BandHelper from the website
- Zip your documents together into a file up to 500MB in size.
- Log into the website and go to the Documents page of the Repertoire, Schedule, Finance or Contacts section.
- Click the Batch Import form at the top of the page and select your zip file.
- To only attach documents to existing songs, leave Add New Songs deselected. To create new songs for any documents in the zip file that don't match an existing document or song name, select Add New Songs.
- Click Submit. This will upload all the files, which could take up to an hour depending on your Internet connection.
When the upload is complete, BandHelper will create new songs containing the contents of any ChordPro and Onsong documents, then discard the documents. For other document formats, BandHelper will…
- Replace existing documents that have the same name.
- Attach new documents to a song, event, transaction or contact with the same base name. For example, a document named "Freebird - horns.pdf" will be attached to a song named "Freebird."
- Add a new song (or event, transaction or contact) for any documents whose names don't match any existing items, if Add New Songs is selected.
The capabilities for viewing documents are slightly different between the website and the apps:
Viewing documents from the website
After you've attached a document to a song, event, contact or transaction, you should see a
document button ![]() appear
next to that item whenever it appears.
Clicking the button opens the default document, which is the first one in
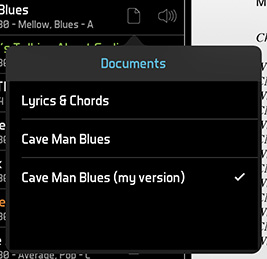
the list for that song. If you have attached more than one document,
you can click and hold over the button until a submenu appears, then
click the desired document name.
appear
next to that item whenever it appears.
Clicking the button opens the default document, which is the first one in
the list for that song. If you have attached more than one document,
you can click and hold over the button until a submenu appears, then
click the desired document name.
Documents you view in the website have the following features:
- Scroll up or down to change pages in a multi-page document, or click the right or left arrow buttons to view additional documents or lyrics attached to the same song.
- Alternatively, use the up and down arrow keys on your keyboard to change pages, the right and left arrow keys to change documents and the escape key to close the document viewer. (You might have to click the document viewer before the keyboard messages are correctly routed to the document.)
- Click the +/- buttons in the viewer toolbar to zoom the document in or out.
- Tap the download button in the viewer toolbar to save a copy of the document to your computer.
Viewing documents from the iOS, Android or macOS app
After you've attached a document to a song, event, contact or transaction, you should see a
document button ![]() appear
when you view that item.
Tapping the button opens the default document, which is the first one in
the list for that song (unless you change Settings > General > Defaults > Document). If you have attached more than one document,
you can tap and hold the button until a submenu appears, then
tap the desired document name.
appear
when you view that item.
Tapping the button opens the default document, which is the first one in
the list for that song (unless you change Settings > General > Defaults > Document). If you have attached more than one document,
you can tap and hold the button until a submenu appears, then
tap the desired document name.
Documents you view in the app have the following features:
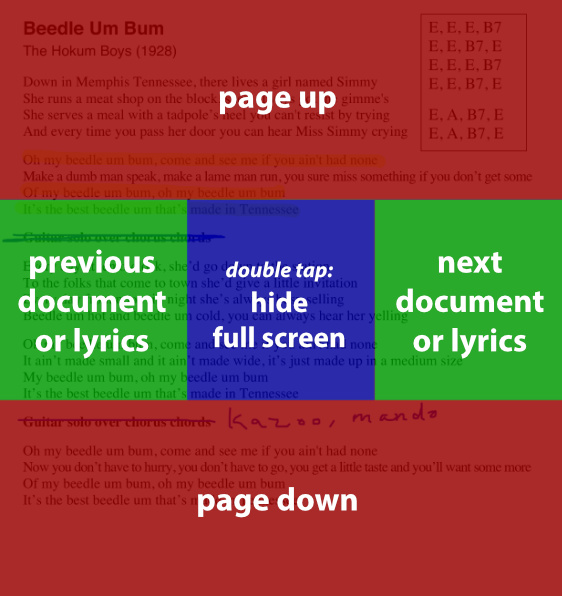
- Swipe up or down to scroll through long documents, or tap the top or bottom third of the document to jump a screen at a time.
- If an arrow appears in the document icon, tap it to begin auto-scrolling.
- Pinch to zoom the document in or out.
- Tap the left or right third of the document to switch to adjacent documents, if multiple documents are attached to the same song.
- If you're showing a document over the top of your song layout, double-tap the center of the document to hide it again.
- Tap the triangle icon in the top right corner to show the document toolbar, which has buttons to...

- Hide the document viewer, if showing above your layout (not pictured here)
- Switch to the previous document, if multiple documents are attached to the same song
- Switch to the next document, if multiple documents are attached to the same song
- Start or stop auto-scrolling
- Save the zoom position after pinch-zooming the document
- Reset to the default zoom position
- Add a marker at the current scroll position
- Set up a custom marker sequence
- Add or edit annotations
- Switch between Fit To Height and Fit To Width
- When clicking the Annotate button, the document toolbar switches to the annotation toolbar, which has buttons to...

- Draw with a pen
- Draw with a highlighter
- Add a text box
- White out a portion of the document
- Erase annotations (double-tap to erase all)
- Undo edits
- Redo edits
- Save your annotations
- Revert to the last-saved annotations
- While editing annotations, you can scroll the document with a two-fingered drag. Or if you have an iPad and an Apple Pencil and you turn on Only Draw With Apple Pencil in the iOS Settings app, you can draw with the pencil and scroll with one finger. If you have an Apple Pencil 2, you can open and close the annotation toolbar by double-tapping the pencil.
- To add markers, scroll the document to the desired position, then click the Add a Marker button in the document toolbar and enter a name for the marker. You can also click an existing marker to rename or delete it. When your document contains markers, all the Next Page and Previous Page functions (including the on-screen hotspots, automation events and app control actions) will jump to the marker positions instead of the page positions.
- If you've added markers, you can arrange them into a custom sequence including repeats. For example, you might add markers for Part A, Part B and Coda, then create a sequence that goes Part A, Part B, Part A, Part B, Coda. Then you can step through the markers in that order from the Document Markers buttons, the Next/Previous Page Or Marker app control actions or the up/down hotspots. To edit the sequence, click the Edit Marker Sequence button in the document toolbar, then click the Add a Marker button to add as many instances of each marker as you need, then drag the "grip" icons to reorder the markers.
BandHelper offers several ways to show different documents or lyrics to different people:
- If you are using only the Lyrics and Chords fields and no attached documents, and some people need to always transpose the chords to a different key, they can edit the song and change the Personal Transpose settings. This is useful for guitarists using a capo, or horn players with non-C instruments.
- If you are using only the Lyrics and Chords fields and no attached documents, and some people want to make personalized edits to the lyrics and chords, you can start by entering default or "shared" lyrics and chords for each song. Then the people who want to replace or customize the lyrics or chords can turn on Settings > Account Sync > Personal Sync > Lyrics or Settings > Account Sync > Personal Sync > Chords. Then those people can edit the songs and enter their own info into the Personal Lyrics or Personal Chords fields. They will still see the shared lyrics or chords for songs where they haven't entered personal lyrics or chords. If needed, account administrators can view or edit other users' personal fields from the song edit pages on the website. Personal lyrics or chords cannot be shared by multiple users, so if two users want to see the same alternative content, they will have to each enter that content separately, or place that content into a document that can be shared.
- If your songs use a combination of lyrics or documents and you know which one each person needs, you can edit each document from the Repertoire > Documents page and change the users the document is assigned to. The document will be hidden from any unselected users and each user will see the first item in the list that is assigned to them. In this setup, the sequence of the documents attached to a song doesn't matter, but you should place the lyrics at the end of the list, so they only appear when no document is assigned.
- If every song has a matching set of lyrics and documents and each person wants to see a different item in the set, you can sequence the lyrics and documents the same way in every song (e.g., always put the lyrics first, then the rhythm chart, then the horn chart). Then each person can change Settings > General > Defaults > Document on their device to show that item in the sequence by default (e.g., setting it to 3 would show the horn chart for each song). This option allows someone to quickly switch between sets of documents -- for example, from the Trumpet 1 parts to the Trumpet 2 parts -- with one settings change.
If you are using the default document or default recording setting and need to add a placeholder in some songs, you can use these empty files: Empty Document - Letter, Empty Document - A4, Empty Recording.
- The Android app can invert PDFs to match the dark color theme using Settings > Appearance > Invert PDF Colors. The other platforms can only show PDFs in their natural color. To show them as white text on a black background, you would have to change the colors within your original document and re-export it as a PDF (or use the built-in Lyrics field instead).
- To display documents correctly, BandHelper needs to know the size of your documents. You can tell BandHelper whether you're using Letter or A4 documents in your account with the Settings > General > Document Size option. BandHelper doesn't support a mixture of Letter and A4 documents in the same account and doesn't support custom page sizes. Some functions won't work correctly if your document sizes don't match the Document Size setting.
- BandHelper also needs to know the orientation of your documents. It assumes documents are portrait oriented, but if you have any landscape documents, you can specify that: go to the Repertoire > Documents page, tap the name of a landscape document and select the Landscape option.
- You can display your documents in two columns if you edit your layout, tap the document viewer, tap its options button in the top right corner, and set Content to 2 Columns. Then open the document toolbar and click the Fit to Height button to display two pages side by side. Or you can set the number of columns for individual documents with the Presentation setting on the document edit page.
- If you have a document that you want to access from any song, such as a page of audience banter ideas, you can turn on the Pinned To All Songs option on its edit page. Then the document will always be available from the document button as if it is attached to every song. If you include the Multiple Document Buttons in your layout, you can set that to show only the song documents, only the pinned documents or both (the default is both).
- If you are using an external display with your device, that display will mirror your entire screen by default. Alternatively, you can set Settings > General > External Display to Document, and then the external display will only show the document when you view it from within a set list. Your layout does not need to include a document viewer to use this feature, so you could view a list-only layout or other information on your device display and a document on your external display.
- You can email or print individual documents after clicking a document name in the Documents list. You can email or print a collection of documents by selecting a show or smart list and clicking the Share Songs button.
- The iOS "Open in..." command doesn't work in the Photos app in iOS. However, you can save JPEGs to your photo library, then tap the Photos button in the Add Documents window in BandHelper, and select the photo from the photo library.
- If you have created your document by scanning a piece of paper, the file size will be relatively large, which will make the document open slowly when you view it within the app. The best documents are created from an electronic source such as a Word or Pages document. If you don't have an electronic source, you can experiment with your scanning settings to minimize your file sizes. Most documents can be scanned in black and white, with 100-150 dpi for regular displays or 200 dpi for Retina displays.
Tutorials