
Importing data to populate your account
BandHelper offers several ways to quickly populate your account with data. You can watch a tutorial video, or read on for more details
Importing songs from a batch of documents or recordings (Website only)
If you plan to attach documents or recordings to your songs, and you already have the document or recording files, the easiest way to add songs is to upload these files.
- Zip your documents or recordings together into a file up to 500MB in size. The zip file should contain either documents or recordings, not both.
- Log into the website and go to the Repertoire > Documents or Repertoire > Recordings page.
- Click the Batch Import form at the top of the page, select your zip file and check the Add New Songs option.
- Click Submit. This will upload all the files, which could take several minutes depending on your Internet connection.
When the upload is complete, BandHelper will create a new song for each uploaded file. For ChordPro or OnSong files with a .chordpro, .chopro, .cho, .pro or .onsong extension, the new song will contain the lyrics and metadata from the file. For other document formats and recordings, the new song will contain only a title and the attached file. You can then edit the song in BandHelper to add more data like artist, key, etc.
If you want to attach both documents and recordings to a song, you can import the documents first to create the songs, then import the recordings without the Add New Songs option. As long as the document and recording file names match, BandHelper will attach the recordings to the songs you already created.
Importing songs from ChordPro or OnSong files (iOS, Android and macOS)
You can also import individual ChordPro or OnSong files in the iOS and Android apps. The file extension must be .chordpro, .chopro, .cho or .pro for ChordPro or .onsong for OnSong.
- Navigate to the Repertoire > Songs list, tap the Import button, tap ChordPro or OnSong, then select files saved in a compatible app, local folder or cloud storage service. On iOS, you can also use the Open In function in another app to send a file to BandHelper.
- BandHelper will create a new song using the data from that file. You can then edit the song in BandHelper to add more data like artist, key, etc.
Importing songs from a playlist (iOS only)
If you have an iTunes playlist set up on your iOS device, you can also add songs by importing them from the playlist. Read on for more details.
- Navigate to the Repertoire > Songs list, tap the Import button at the top of the list and tap Playlist. Select the desired playlist, then tap Done (iPhone/iPod) or Select (iPad) to continue.
- BandHelper will show you a preview of the data it's importing. If a song title in the playlist matches an existing song in your database, BandHelper will not import that song. Duplicate songs will appear in gray text in the import preview window.
- BandHelper will import the Title and Artist for each song. If they are defined in iTunes, BandHelper will import additional fields as follows: iTunes Genre to BandHelper Tags, if Genre matches an existing tag; iTunes Beats Per Minute to BandHelper Tempo; iTunes Lyrics to BandHelper Lyrics; and iTunes Comments to BandHelper Notes.
- BandHelper will also import the recordings (audio files) from iTunes and attach them to your songs. Most of the time it takes to import a playlist is spent copying the recordings into the app, which allows BandHelper to sync the recordings to all the devices in your band.
- After importing the songs, BandHelper will create a new set list using the playlist name, and will add all the playlist's songs to that set list. (If a set list with this name already exists, it will add any songs that aren't already in that set list.) This allows you to review the songs you just imported and add more data manually if needed. It also allows you to build set lists in iTunes if you wish, then import them into BandHelper even if the songs already exist there. If you don't need to keep this set list, you can delete it without affecting the imported songs.
Importing Songs from a data file (Website only)
You can add songs with additional data by importing them from a song list that you set up on your computer.
- Your list must be saved in a tab-delimited text format. You can create this format directly using Notepad (Windows) or TextEdit (Mac), or set up a spreadsheet in Excel or Numbers and save your file in this format when you're done. If your file contains non-ASCII characters like smart quotes, you will also need to select a UTF encoding when saving your file (UTF-8 is best, but the "UTF-16 Unicode Text" option in Excel will also work; a "Little Endian" encoding will not work). You can use this sample file as a starting point (right-click and select the Download or Save File option).
- The file should contain the following columns:
Column 1: Title
Column 2: Artist
Column 3: Tags
Column 4: Key
Column 5: Time signature
Column 6: Tempo
Column 7: Duration
Column 8: Starting pitch
Column 9: Document filenames
Column 10: Recording filenames
Column 11: MIDI preset names
Column 12: Lyrics
Column 13: Chords
Column 14: Notes
Column 15: MIDI song number
Column 16: MIDI program change (incoming)
Columns 17+: Custom fields - Here are some special notes about some of the fields:
- Tags: You can enter a list of words or phrases here, separated by commas. If the tags are not already in your account, they will be added when you import the file.
- Duration: You can enter durations as minutes and seconds separated by a colon (e.g., 3:15).
- Document filenames: If you plan to attach documents to your songs, you can specify their file names (including the file extensions) and BandHelper will create placeholders for the documents upon import. You can then zip your document files together and batch-upload them on the Repertoire > Documents page. To attach multiple documents to a song, you can include their names separated by pipe characters. For example, "How Long lyrics.pdf|How Long chart.pdf".
- Recording filenames: If you plan to attach recordings to your songs, you can specify their file names (including the file extensions) and BandHelper will create placeholders for the recordings upon import. You can then zip your recording files together and batch-upload them on the Repertoire > Recordings page.To attach multiple recordings to a song, you can include their names separated by pipe characters. For example, "How Long - Leroy Carr.mp3|How Long - Frankie Jaxon.mp3".
- MIDI preset names: If you've already added MIDI presets to your account, you can specify their names and BandHelper will attach the presets to the songs upon import. To attach multiple presets to a song, you can include their names separated by pipe characters. For example, "How Long verse|How Long chorus".
- Lyrics, chords and notes: To include line breaks in these fields, insert the character sequence \n where the line breaks should appear.
- MIDI program change (incoming): This is a program change that you can assign to a song to select the song from another MIDI device. This field should include an MSB, LSB and patch number written as decimals and separated by pipe characters. For example, "10|11|12" would respond to MSB 10, LSB 11 and patch 12. If you want to send program changes for a song, you must create a MIDI preset with those program changes and attach the preset to the song.
- Custom fields: If you'd like to populate your custom fields for your songs, you can include this text in any number of additional columns in your import file. BandHelper will map the additional columns to your defined custom fields in the sort order you've defined for them, so you must set up your custom fields in BandHelper before performing the import.
- When the file is ready, log in to your account and click Repertoire > Songs. Then click the file selection button labeled Batch Import, select your file and click Submit.

- After submitting your file, BandHelper will
show you a preview of the data it's importing. You can
review this to make sure your file is set up correctly before
continuing. Songs that have already been imported will appear faded in the list and will not be imported again. If everything looks correct, click the Continue button.
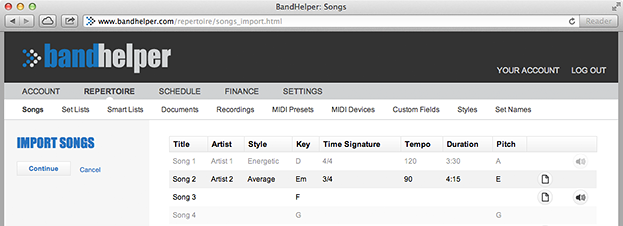
- BandHelper will import your song data and then return to the Songs list, where you can see your new data.
Importing MIDI presets from a data file (Website only)
Importing MIDI presets from a file is similar to importing a batch of songs from a file, with these differences:
- You can import your file in the web interface, from the Import button at the top of the MIDI Presets list.
- The file should contain the following columns:
Column 1: MIDI preset name
Column 2: MIDI program changes
Column 3: MIDI control changes
Column 4: MIDI raw data device
Column 5: MIDI raw data hex code
Column 6: Song title - You can enter the program changes as a comma-separated list with one item per device. Each item should include a device name, MSB, LSB and program number separated by pipe characters. For example, "My Keyboard|10|11|12,Guitar Processor|13|14|15" would send MSB 10, LSB 11 and program 12 to the port and channel set for the My Keyboard device, and MSB 13, LSB 14 and program 15 to the port and channel set for the Guitar Processor device. The device name must exactly match a MIDI device that is already in your database. The MSB, LSB and program values should be written as decimals (not hex code) and counted up from 0 or 1, depending on the Numbering setting in each MIDI device.
- You can enter the control changes as a comma-separated list with one item per device. Each item should include a device name, controller number and value separated by pipe characters. For example, "My Keyboard|20|25,Guitar Processor|30|35" would send controller 20 with a value of 25 to the port and channel set for the My Keyboard device, and controller 30 with a value of 35 to the port and channel set for the Guitar Processor device. The device name must exactly match a MIDI device that is already in your database. The controller and value should be written as decimals (not hex code) and counted up from 0 or 1, depending on the Numbering setting in each MIDI device.
- If you specify a device in column 4, any raw data you enter will only be sent to the specified device. Otherwise, it will be sent to all devices.
- If you specify a song title, the MIDI preset will be attached to that song after importing. The title must exactly match a song that is already in your account. If the title does not match any existing songs, or you don't specify any song title, the MIDI preset will still be imported, but will not be attached to any songs.
- You can specify the same song title for multiple presets. They will be attached to the song in the order in which they appear in the file.
- Any imported MIDI presets will be assigned only to the user who imported them. If needed, you can assign the presets to different users with the batch update function after importing them.
You can use this sample file as a starting point (right-click and select the Download or Save File option).
Importing events from a data file (Website only)
Importing events from a file is similar to importing a batch of songs from a file, with these differences:
- You can import your file in the web interface, from the Import button at the top of the Events list.
- The file should contain the following columns:
Column 1: Name
Column 2: Category (optional)
Column 3: Start date in YYYY-MM-DD format
Column 4: End date in YYYY-MM-DD format (optional)
Column 5: Start time in 24-hour HH:MM format (optional)
Column 6: End time in 24-hour HH:MM format (optional)
Column 7: Include In Website Widget (X or leave blank)
Column 8: Confirmed (X or leave blank)
Column 9: Cancelled (X or leave blank)
Column 10: Pay
Column 11: Notes
Columns 12+: Custom fields - If you specify a category name, the event will be assigned to that category. The name must exactly match a category that is already in your account. If the name does not match any existing categories, or you don't specify a category, the event will still be imported, but will not be assigned to a category.
- To include line breaks in the notes fields, insert the character sequence \n where the line breaks should appear.
- If you'd like to populate your custom fields for your events, you can include this text in any number of additional columns in your import file. BandHelper will map the additional columns to your defined custom fields in the sort order you've defined for them, so you must set up your custom fields in BandHelper before performing the import.
- Imported events will be assigned to all the active users.
You can use this sample file as a starting point (right-click and select the Download or Save File option).
Importing contacts from a data file (Website only)
Importing contacts from a file is similar to importing a batch of songs from a file, with these differences:
- You can import your file in the web interface, from the Import button at the top of the Contacts list.
- The file should contain the following columns:
Column 1: Name (person or business)
Column 2: Contact name (if a person within a business)
Column 3: Job title
Column 4: Phone number
Column 5: Email address
Column 6: Street address
Column 7: Category (optional)
Column 8: Notes
Columns 9+: Custom fields - If you specify a category name, the contact will be assigned to that category. The name must exactly match a category that is already in your account. If the name does not match any existing categories, or you don't specify a category, the contact will still be imported, but will not be assigned to a category.
- To include line breaks in the address or notes fields, insert the character sequence \n where the line breaks should appear.
- If you'd like to populate your custom fields for your contacts, you can include this text in any number of additional columns in your import file. BandHelper will map the additional columns to your defined custom fields in the sort order you've defined for them, so you must set up your custom fields in BandHelper before performing the import.
- Contacts cannot be assigned to individual users in your account. However, you can turn on Event Contacts Only for your users if you don't want to share your entire contact list with them.
You can use this sample file as a starting point (right-click and select the Download or Save File option).
Importing projects from a different BandHelper account (Website only)
You can follow these steps to copy a project from one BandHelper account to another:
- On the BandHelper website, log into the source account and go to the Admin > Export page.
- Select the project and click Continue. A file will download to your computer.
- Log into the destination account and create a project to import into.
- Go to the Admin > Import page and select the new project. Then select the file you exported and click Continue.
- When the import is finished, a confirmation page will appear telling you what was imported.
- You can only import once into a project, to avoid duplicates. If you change your mind about what to import, you can delete the new project in the destination account and start over.
The steps above will import your project data (songs, set lists, MIDI presets, etc.) but not your attached files (documents and recordings). If you've attached files to your songs, you can export these files with the Export button on the Repertoire > Documents or Repertoire > Recordings pages in the source account. You can then import these zip files with the Batch Import button on the Repertoire > Documents or Repertoire > Recordings pages of the destination account.
Importing projects from Set List Maker (Website only)
If you're ready to migrate from Set List Maker to BandHelper, you can use our Set List Maker migration guide.
Tutorials